Getting the correct signal quality is not just a bonus – it’s more or less the backbone from any setting using a coaxial cable. Whether you run a test bench or cable lighting control, the smallest hiccups in the connector can dispose of everything. So, if you ask questions how to join the coaxial cable with the connector correctly, this guide may only store one or two headaches.
We will walk through how to prepare your cable, choose the right connector, and install it clean – a type of technique that can be relied on by engineers, technicians, and project leads. For fast refresher, our blog breaks it clearly for different Cable type.
Take off the coaxial cable correctly
Peeling the coaxial cable is not just the first step – it is arguably the one that regulates the tone for others. Strip is too deep, and you might print a core or tear the shield; Too shallow, and the connector will not sit properly. The goal is a clean and layered disclosure: middle conductor, dielectric, protector, and jacket – everything is trimmed to specifications.
Using a coaxial cable stripper tool makes this process quite easy, because it is designed to remove each layer in one way. But even so, the gentle touch and steady hands walked far. The manual offers control, but they need careful adjustments for the type of cable.
So, before thinking about combining or soldering coaxial cables, it is better to get a strip exactly, even, and free of damage. That’s what gives your connection the best chance to uphold.
Preparing a Shield and Dielectric
After the cable is stripped, your attention shifts to adjust the shield and preserve the dielectric. This beet is often rushed – but that’s where the signal strength can begin to slip.
The fabric, or foil protector, needs to fold back smoothly to the outer jacket. Avoid binding or breaking strands, because uneven protectors means patch protection from disorders. Then, check the dielectric. It must remain not fragile and centralized – his task is to give a distance of the conductor correctly, and each dent may disrupt the signal flow.
Common mistakes to avoid:
- Tearing or watering the shield while folding
- Destroy dielectric when cutting
- Leave a loose strand that can make a short signal
- Overandling, which weakens the material
A good cable protective technique here makes all differences. This is not striking, but it’s important – and you will know if the wrong signal starts blinking.
Choosing the right type of connector (BNC, type F, SMA)
Not every coaxial connector matches every job – so choosing the right earlier can save a lot of you later. Connectors need to match the type of signal, frequency, and space that you must do. And yes, the size is important, but so does how often you will connect and break the relationship.
This is a quick comparison:
| Connector type | Use Kasing | Characteristics |
| BNC | CCTV, Dental Test | Fast twist key, easy to use |
| F-Type | TV, broadband | Screw, low cost, good for static settings |
| Senior high school | RF, Data Comms | Threaded, compact, capable of high frequency |
For example, if you find out how to attach a BNC connector to lab equipment, you will want speed and repetition. If this is a type-F-type connector installation for permanent fit-out, budget-friendly screws might be better.
Choosing the right to avoid the problem of stopping coaxial cables on the phone. To explore solutions designed for precision and reliability, look at Altimex Interconnection cable service.
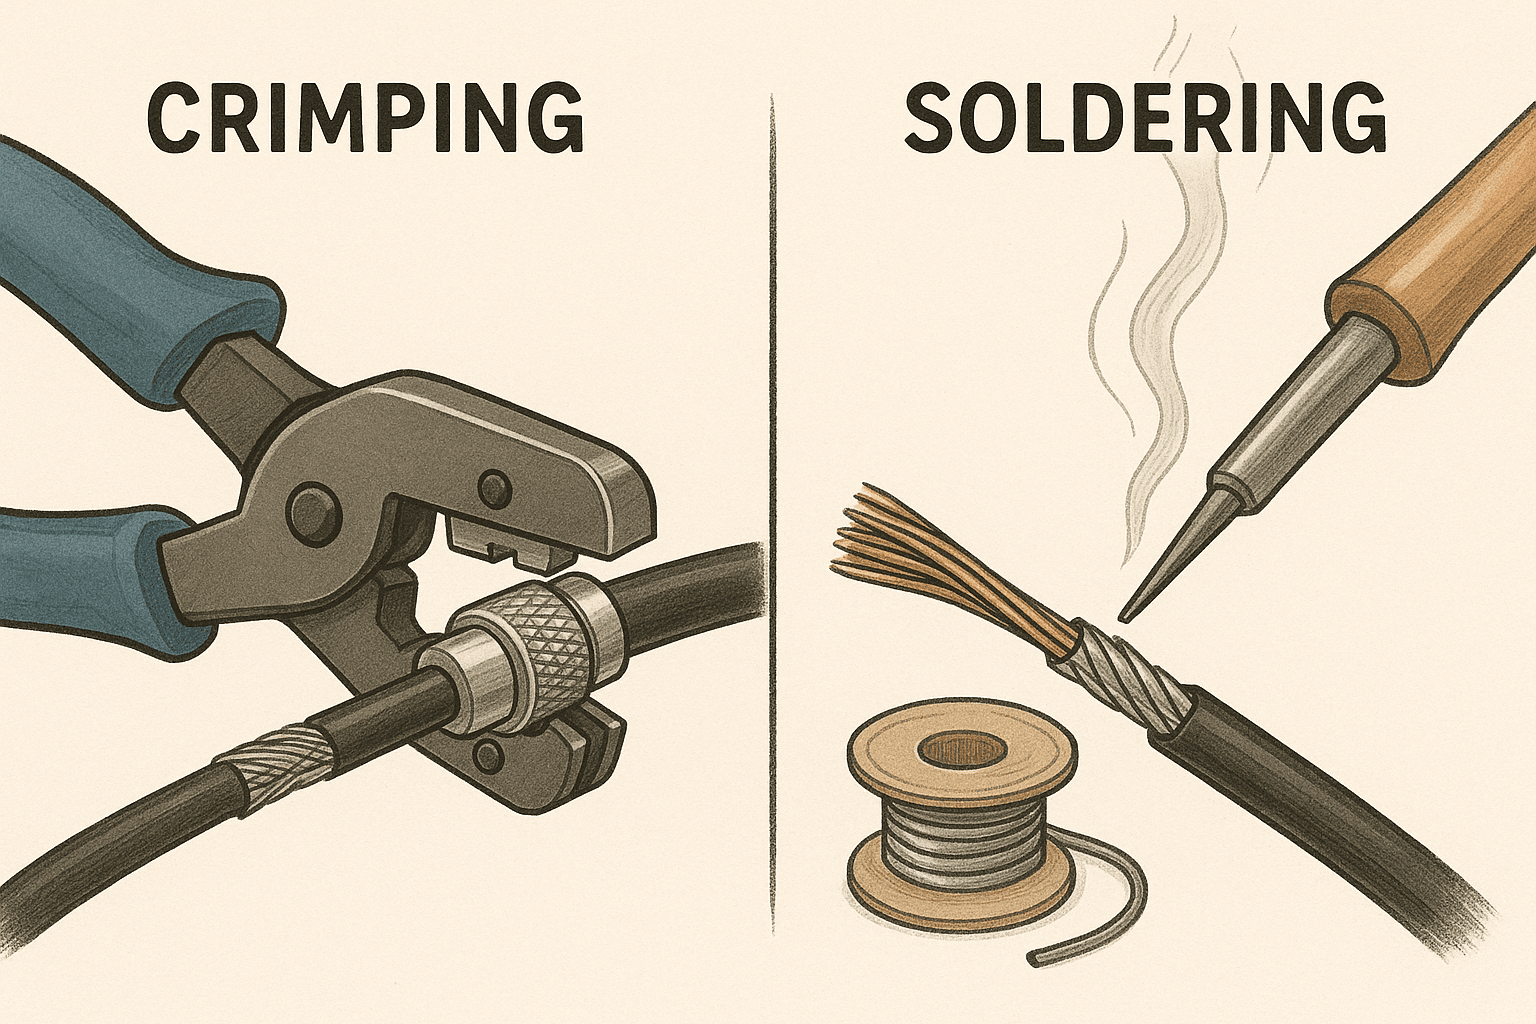
Crimping and soldering techniques
Different work requires a different end result – and when it comes to join the coaxial cable, it is usually crimping or soldering. Both work, but each of them has its strangeness.
Crimping tends to be faster and more consistent for high volume work. This is the goal for field technicians, because the connection is strong without heating the cable. You will need a CIMP and dice of the right size for your connector.
SolderingOn the other hand, it takes a little longer but provides a very solid combination. Often chosen when a permanent connection or when a strong space.
Crowning Steps:
- Insert the cable into the connector
- Slide the curly arm to its place
- Use the CRIPP to secure the combination
Solder Steps:
- Middle conductor can
- Slide connector to the cable
- Soldering in place without too hot
So, do you like coaxial cables or soldering coaxial cable ends, the key ensures it is clean, safe, and consistent.
Attach the connector step by step
This section where things are united – literally. The aim is to match the connector with fit and evenly so that it feels like part of the cable itself. Whether you are after speed or precision, still in a routine that can be repeated helps.
The following guide step by step is a simple step that works in most types of connectors:
- Check your cable preparation – All layers must be trimmed evenly, there are no incisions or commotion.
- Slide on any shoes or sleeves – You will regret missing this after the connector is on.
- Insert the middle conductor into the pin or connector cavity – It must enter smoothly, without force.
- Install the outer jacket into the body of the connector – Baired must sit flat and flat.
- Keret or solder as needed – Do it clean, using the right tool or technique.
- Check the results – There is no gap, no shake, no conductor is open.
That is the termination of coaxial cables carried out correctly or no commotion, no do-overs.
Test the connection for signal integrity
So, you have attached a connector – now what? Well, unless you test it, you basically guess. And in some settings, a weak or wrong connection is not just annoying – it can remove the entire system.
Start simple with continuity examiners. This checks whether the signal path is not interrupted, which should be. If there is no beep or light, something is wrong. For more detailed examinations, use coaxial signal examiners to find problems such as signal loss, shorts, or impedance incompatibility.
What you are looking for is clean and strong continuity and stable reading. If there is nothing, there is a possibility that there is something wrong during preparation or attachment. Catch the best now, not after installation.
Ensure assistance and protection of cable strain
A good connection can still fail if it is under pressure, and that’s where the help steps come in. It’s less about the cable itself and more about maintaining a safe combination of attracting, turning, or bending.
Strain the release boots, clamps, or even hot beam cylinders all can increase support. Boots give you a little flexibility without tension, while clamps secure cables to the house or frame. Heat it neatly shrink everything and add a little buffer.
Without some forms of strain assistance, connectors can loosen or crack over time, especially in systems that are often moved or adjusted. This is a small step that, in a certain way, protects everything you just did. If you are not sure what suits your settings best, don’t hesitate contact us For adapted advice.
Posting how to join a coaxial cable with a connector first appeared in Altimex.
Game Center
Game News
Review Film
Berita Olahraga
Lowongan Kerja
Berita Terkini
Berita Terbaru
Berita Teknologi
Seputar Teknologi
Berita Politik
Resep Masakan
Pendidikan
Berita Terkini
Berita Terkini
Berita Terkini
review anime
Gaming Center
Originally posted 2025-08-24 12:54:23.